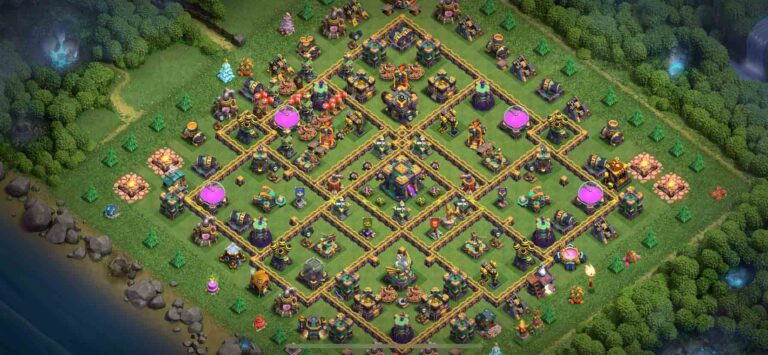
Creative Games – This TH15 Anti Blimp War Base is specifically designed to shut down one of the most dangerous strategies in Town Hall 15 war attacks: the Blizzard Blimp. At TH15, many attackers rely on Super Archer Blimp or Blizzard entries to delete the core early. This layout counters that strategy by centralizing the core, layering defensive coverage, and creating heavy spell pressure the moment troops land.

Instead of giving attackers easy value from a single blimp drop, this base forces commitment, risks, and uncomfortable spell timing. If you’re tired of watching your base get carved open in the first 30 seconds, this design offers a serious defensive answer.
Why Anti Blimp Matters at Town Hall 15
At Town Hall 15, Blizzard and Super Archer Blimp strategies are extremely popular in Clan War and CWL. The reason is simple: if the blimp deletes the Monolith, Infernos, Spell Towers, and Town Hall, the rest of the base becomes much easier to clean up.
That’s why this layout focuses on preventing high-value blimp landings. The core is heavily layered with overlapping defensive zones. Even if a blimp reaches the center, troops inside face stacked damage immediately.

Instead of being vulnerable to one perfect spell combo, this design forces attackers to invest additional Freeze or Invisibility spells — and if they miscalculate, the entire strategy collapses.
Centralized Core Structure That Punishes Deep Entries
The strength of this layout lies in its centralized core. The Town Hall is positioned deep inside multiple layers of walls and compartments, surrounded by high-damage defenses.
This creates a no-fly comfort zone.
When a blimp attempts to land directly on top of the Town Hall, it immediately enters a kill zone covered by:
- Monolith
- Inferno Towers
- X-Bows
- Spell Tower support
- Hidden traps around the core
Even if attackers use Warden ability to protect the blimp, the landing area is not safe. Once troops exit, they are forced into tight compartments with very limited movement space.
That restriction dramatically reduces Blizzard value.
Monolith and Inferno Coverage Around the Town Hall
The Monolith is positioned in a way that protects both the Town Hall and surrounding defenses. Any hero or tank unit entering the core will immediately feel heavy single-target pressure.
Inferno Towers are spaced carefully to avoid giving Freeze spell value on multiple targets. This forces attackers to choose which defense to disable, instead of freezing everything at once.
That split pressure becomes critical during blimp attacks. If Freeze timing is even slightly off, Super Archers melt under combined Monolith and Inferno damage.
This layered coverage is what makes the base anti-Blizzard rather than just anti-air.
Anti Queen Charge Design Philosophy
Beyond Blizzard defense, this layout also limits Queen Charge value.
Queen Charge strategies depend on creating a funnel and slowly pushing into the core. However, in this base, entry points are intentionally awkward. The outer compartments encourage the Archer Queen to walk sideways instead of diving inward.
If a player attempts a deep Queen Charge, they must commit heavy spell investment just to break multiple layers of walls. Meanwhile, single-target Infernos and the Monolith constantly apply pressure.
This makes the charge risky. One misstep and the Queen ability is forced early, reducing overall attack momentum.
Spell Tower Placement and Defensive Synergy
Spell Towers at TH15 are game-changers. In this layout, they are placed where attackers are most likely to cluster — especially near the Town Hall and core defenses.
If using Poison Spell Tower, it slows troops and reduces damage output right when they need it most.
If using Rage Spell Tower, it amplifies defensive damage during that critical moment when attackers try to secure the Town Hall.
Either way, the synergy between Spell Towers, Monolith, and Infernos creates a defensive spike that often decides the entire battle.
Trap Zones That Disrupt Blimp and Hero Value
A good anti blimp base is not just about walls and defense positioning — traps matter.
Around the Town Hall compartment, traps are likely clustered to catch blimps and hero pushes. Seeking Air Mines help prevent clean blimp travel. Giant Bombs and small bombs punish ground entries after the Town Hall goes down.
Because the core is compact, trap value multiplies. When attackers land inside, there’s very little room to spread out safely.
That pressure often forces emergency spell usage, leaving the back end vulnerable.
How This Base Handles Root Rider and Smash Attacks
Even though this is labeled as a TH15 Anti Blimp War Base, it also performs well against Root Rider and smash-style attacks.
Root Riders depend on breaking compartments efficiently. However, the layered core design means opening one section does not automatically open the entire base.

Smash attacks often lose momentum when forced to move through multiple turns. This layout’s structure encourages splitting and awkward pathing, especially once the Town Hall poison activates.
That delay gives defensive units more time to eliminate key heroes and high-damage troops.
Potential Weaknesses to Keep in Mind
No base is invincible. A carefully planned entry with proper funneling could still gain strong value.
If an attacker avoids the core early and saves spells for late-game, they might stabilize after the Town Hall is destroyed. Additionally, perfect Warden ability timing can still secure blimp value if executed cleanly.
To reduce predictability, rotate traps and slightly adjust Air Sweeper directions between wars. Small tweaks prevent opponents from memorizing your layout.
When to Use This TH15 Anti Blimp War Base
This layout is optimized for:
- Clan War
- CWL
- Competitive matchups
- High-level trophy pushing
It is not designed primarily for farming. Resource protection is secondary to defensive strength.
If your goal is reducing triple rates in war and forcing opponents into 2-star finishes, this base fits perfectly.
Final Thoughts on This TH15 Anti Blimp War Base
This TH15 Anti Blimp War Base works because it targets one of the most dominant TH15 attack strategies directly. The centralized core, heavy defensive layering, and spell tower synergy combine to create a dangerous landing zone for Blizzard attacks.
Instead of giving easy early value, it demands perfect execution. And at Town Hall 15, perfection is rare. If you want to make attackers uncomfortable and protect your war performance, this layout is absolutely worth testing.